It’s Morph’s 3rd Birthday soon, and along with some new toys and special treats, he’ll be getting a new DIY dog bowl stand.

Pet supplies can be shockingly expensive, and as much as we love our little furbaby, I’m not prepared to pay a ton of money for a raised dog feeder. That’s why we decided to build this modern DIY dog bowl stand ourselves.

It’s a beginner-friendly DIY project that you can easily build yourself in about an hour. Although it looks like something you’d find in a high-end pet store, it costs less than 40€ to make.

Tools & Material You Need To Build A DIY Raised Dog Bowl Stand
This post contains affiliate links. We only recommend products we love and think that you will, too! Read our full disclaimer here.

Materials
- Square edge stripwood 20 x 20mm for the frame of the elevated dog feeder (see below for the exact measurements)
- A flat piece of wood for the top of the dog feeder
- Dog bowls
- Wood glue
- Sandpaper
- Paint
- Danish oil or varnish
- Optional: Stain (& a rag and gloves)
Tools
- Mitre Saw
- Clamps
- Jigsaw
- Router (optional)
- Speed square
- Paintbrush
- Tape measure & pencil
- Optional: Compass
How To Build A Raised DIY Dog Bowl Stand
Building this raised dog bowl stand is easy and quick. It only consists of two parts: the frame, which is made out of strips of wood, and the top, which is glued to the frame.
As always, we’re sharing the detailed steps below.
Step 1
Cut The Timber For The Frame & Top
Start by cutting the pieces of timber into pieces to build the frame.
You need 4 long pieces for the horizontal supports, 4 short horizontal support pieces, and 4 legs. Depending on how big your dog is, adjust the height of the legs so the elevated dog bowl stand is at a height that’s comfortable for your pet.

We cut the square edge moulding strips with a mitre saw, but there aren’t many cuts, and you could easily use a fine saw and mitre box for this project, too.
You’ll need:
- 4 x 43cm strips for the long horizontal supports
- 4 x 16cm strips for the horizontal supports
- 4 x 25cm strips for the legs (adjust the length to suit your dog)
- 1 x 43cm x 20cm piece of wood for the top (ours is 19mm thick)

We cut the timber for the top with our new table saw, but you could use a plunge saw or even get it cut in the DIY store where you buy it.
The top of our DIY dog bowl stand is 43cm x 20cm, which is the perfect size to fit our two dog bowls and still have some space around them.
Step 2
Add A Groove (or Cut-Out) To The Top
Our dog bowls sit on top of the dog bowl stand, so to stop the bowls from moving around, we decided to add some grooves into the wood with a router.

It turns out that making a perfect circle without a jig is almost impossible, and as I started making the groove, I just couldn’t achieve a result I knew I’d be happy with.

In the end, I decided to cut out the circles completely and then glue a board to the underside of the feeder to hold the bowls in place. If you use bowls with a lip where you can rest the edges directly on the edge of the cutout, there’s obviously no need to add a bottom support.
Draw two circles on the timber with the help of a compass. The circumference should be slightly larger than your dog bowl. We’re using these pretty bowls, which have a diameter of 14cm, so we made our groove 14.5cm large.

Then, use a jigsaw to cut out a hole for the bowl. As I decided to engrave the top of the dog bowl stand with our dog’s name, I also used our new laser cutter to cut out the circles. There’s absolutely no need to use a laser, though – a jigsaw will do the same job.
I also rounded the edges of the top slightly with our router. You could just sand them smooth and slightly rounded by hand, though.
Step 3
Assemble The Frame
Make sure to sand all pieces to ensure they are completely smooth before assembling the frame.
We love using pocket holes and had considered them for this project, but the timber strips are quite thin, so we decided just to glue the whole frame together.
If you are using thicker timber strips, you could definitely add pocket holes for a stronger connection, though.

First, assemble the two large horizontal frames and then connect them to each other with the legs.
Apply a generous amount of wood glue to each end and clamp the pieces together to make two rectangles. Double-check that everything is square with a speed square, then wait for everything to dry.
Next, glue a leg piece to each corner of one of the rectangular frames and then glue the second rectangle on top. As before, clamp everything together while the glue dries.

Step 4
Paint & Stain Everything
Paint the frame with wood paint (ours is in Farrow & Ball—Paean Black) and wait for it to dry before lightly sanding everything with fine sandpaper (minimum 240 grit) to remove any air bubbles and imperfections. Then, give everything a second coat of paint.

We also decided to stain the top of the feeder a darker colour. We love using this wood stain as it’s easy to apply and gives a fantastic result. Just rub it over the wood surface with a clean rag, and if you want a darker finish, apply another coat or two until you’re happy with the result.

Staining the wood is completely optional. We love the darker wood, though, and think it’s a nice contrast to the lighter dog bowls.
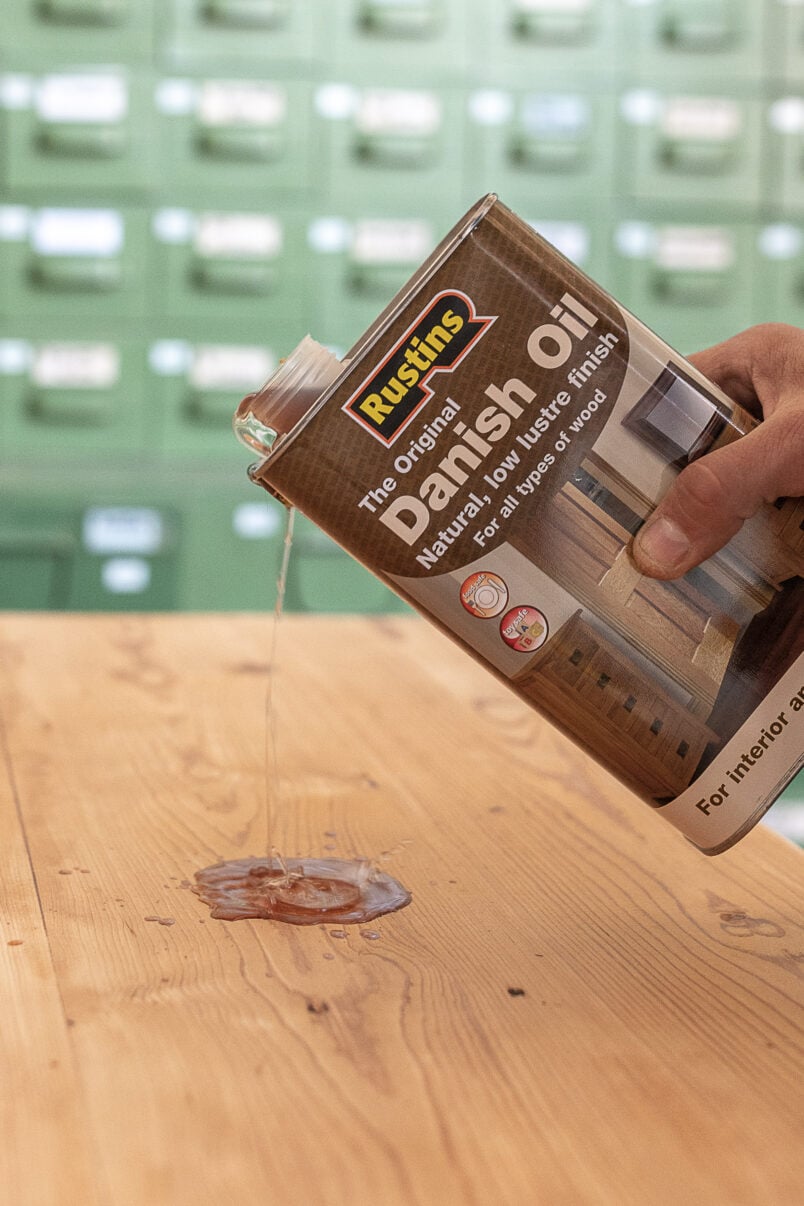
To protect the wood, we recommend oiling it with danish oil. Apply a couple of coats of oil with a clean rag, letting each coat dry before applying the next.

You can read why we love Danish oil and our full guide on how to apply it on wood here.
Step 5
Add The Top
The last thing to do is attach the top to the frame.
Apply a generous amount of wood glue to the top of one side of the frame. Clamp the top piece of the dog bowl stand to the frame and wait for it to dry.

A good quality wood glue is strong enough to firmly hold the pieces of timber together without needing screws or nails, but if you want your DIY dog bowl stand to be extra sturdy, we’d recommend using larger pieces of timber and using pocket holes to connect them.

The last thing to do is to glue a piece of wood to the underside of the top of the dog bowl stand so that the bowls can’t fall through the holes. Apply a generous amount of wood glue and clamp the support piece in place while the glue dries.

Step 6
Add The Dog Bowls and Enjoy!
All that’s left to do is place the dog bowls in the grooves and fill them with some food and water for your dog.
After almost two years with our furry friend, it was inevitable that the occasional dog-friendly DIY project would crop up here. We love how this DIY dog bowl stand turned out, and, more importantly, Morph seems to love it, too.

Time & Money – How Much Does It Cost To Build A Raised DIY Dog Bowl Stand
As I already mentioned, this project was quick and cheap to make. The most expensive part is the dog bowls we chose, but endless options are available if you want to make it even more budget-friendly.
We actually used scrap wood and supplies we had lying around, so apart from the new dog bowls, the project was almost free to build.
- Timber Strips | 8€
- Timber Top | 4€
- Sandpaper | 3€
- Wood Glue | 1€
- Stain & Paint | 3€
- Dog Bowls | 20€
Total about 40€

Why should a dog bowl stand be elevated?
A raised dog bowl makes it easier for large and older dogs to eat and drink and improves their posture because they’re not bending over as much.
Elevated bowls also help with swallowing and keep the feeding area cleaner, as the food and drink are closer to your dog’s mouth. The verdict is still out on that one, though!

How high off the ground should a dog bowl be?
To calculate the height of your dog’s elevated bowl, measure from the floor to the top of their back and subtract 15cm. This will give you the maximum height for your DIY dog bowl stand. Check out this post on PetJunkie.com for more instructions and advice on measuring the correct height for your dog.


Leave a Reply